Showing posts with label Tutorial And Tips. Show all posts
Wednesday, May 23, 2012

How To Format External Hard Drive And USB Drive In Mac OS X

This is for MAC OS X users who wish to format External Hard Drive or Flash Key to be compatible with Mac OS X, as we all know that Mac OS X is able to read various filesystem formats including those from Windows, Windows MSDOS, NTFS and more.

However to get a cleaner road for your filesystem it is recommended to make it compatible with Mac OS by formatting the file. And the following are the steps you can follow.
  • Plug your USB or Hard drive to your Mac computer.
  • Navigate to Applications > Utilities, and then run Disk Utility.
  • Locate the drive name from the left hand side of Disk Utility and click on it
  • Hit on this tab: Erase on top.
  • On the Format: click the contextual menu and you need to choose: Mac OS Extended (Journaled).
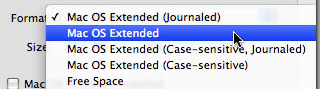
    Format Hard Drive In MAC OS X
  • Name your drive, any name you like and it can be changed latter.
  • Hit the Erase button and then reconfirm on the appearing popup window.
That's how you format external hard drive or flash key to match with Mac OS.

Monday, April 16, 2012

Fix Error 1611: iPhone Could Not Be Restored Unknown Error Has Occurred

Do you meet Error 1611 when trying to restore your iPhone 3GS, iPhone 4, iPod Touch 3G / 4G or iPad? Then here is the fix. Error 1611 appears followed with error message like this: "The iPhone "your device name" could not be restored. An unknown error has occurred (error 1611)". Just like in the following picture.

Error 1611 iTunes

Fix Error 1611


Use one of the ways, try one first if it fails, then follow the second way.

1. Reboot your computer, then change the port of your USB.

2. Or, follow the instructions from the following video.


Hope one of the ways above fix Error 1611 you are currently experiencing while restoring your iOS device.

Sunday, April 8, 2012

Install SiriPort To Bring Siri To iOS 5.1 iPhone 4, 3GS, iPad, iPod Touch 4G

Remember about SiriPort? With SiriPort you can install a fully functional Siri to devices older than iPhone 4s without Siri Proxy Server an without having or borrowing the 4s. If you do, here is a good news. Because the developer of this candy has made an update to support the iOS 5.1 firmware.

Now SiriPort is in 1.5-0 version, and it works only to  jaibroken iOS devices running on iOS 5.1 ( won't work with firmware versions outside this one). According to its developer, in this version you will find few changes to its proxy server in order to taking care of the request but with not frequent connectivity problems.

One more thing, SiriPort doesn't take Spire tweak, therefore if your device having Spire installed, remove it before going to install SiriPort 1.5-0. Let's install it to your jailbroken iOS devices, anyway below is a list of device's models are supported by SiriPort 1.5-0:
  • iPad
  • iPod Touch 4G
  • iPhone 4 (CDMA)
  • iPhone 3Gs

How to install SiriPort 1.5-0 to iOs 5.1 devices older than iPhone 4s without Siri Proxy Server.


Step 1: If you haven't, then tethered jailbreak your iPhone on iOS 5.1 first.

Step 2: Launch Cydia, and then add this repository url:

http://repo.siriport.ru


Step 3: Then install SiriPort for iOS 5.1. However if you use iFile, then you need to install mobilesubstrate first.

Step 4: Reboot the iPhone, iPad or iPod Touch.

Step 5: Now visit this url: siriport.ru/1.crt to download iPhone 4s certificate file. You can send the email containing the certificate file to yourself to open the email from your iPhone.

Step 6: Again, reboot the iPhone. Afterward you need to turn ON Siri in Settings area.

Step 7: This is the best part, now it's time to activate Siri then say helo to her: "Hi Siri". If in this first attempt, you find no luck. Then try again after waiting for about 5 minutes. Then say "Hi Siri" again. Doing it repetitively until you get a response from her, once you get, you will get and enjoy a fully functional Siri for your iPhone 4, iPhone 3GS, iPod Touch 4G, iPad.

Hope this post helps and see you in another posts!

Related post:

Install SiriPort iOS 5.1.1 iPhone 4, 3GS, iPad, iPod Touch 4G, 3G To Get Siri

Fix Poor Wifi Reception / Connection On New iPad

The New iPad, just like other Apple's products, always be put into a hard scrutiny and then if they managed to find a shortcoming within, then it will be exposed, of course people expect everything will work for the money they spend to buy this good looking tablet. No body is willing to face the fact the device they bought doesn't meet their expectation, right? Sure you agree with me. It's all about satisfaction and to keep you away to become one of the Mesothelioma patients...lol.

Just like the poor wifi reception on the New iPad, Apple support forum has been surrounded with complaints concerning the wi-fi iss strangely slow no matter of the network they join. You might be experiencing this pain too, but don't worry there is a workaround for the said problem, it works, and it's worth a try.

Fix poor Wi-Fi connection / reception on New iPad.


If your Wi-Fi reception is awful and give you bad times, then try this simple fix.
  • Go to Settings and then General
  • Click on Network, then click on Wi-Fi
  • Tap the blue arrow next to the wireless router you are connected to
  • So in then next screen, click on Forget this Network
  • Now back to Wi-Fi, and join again the network you just forgot
Once you finished with the above steps, you will see a full reception bars, look at the upper left wifi indicator.

Full Wifi Reception New iPad

In rare case the above steps still don't give you full reception, so try this steps too as the last effort:

  • Go to Settings, tap General then Reset
  • Click on Reset Network Settings
  • Reboot your new iPad
  • Now connect your new iPad to a wireless network again
  • Resetting network preferences loses router passwords, be sure to have those handy beforehand.
This should fix the poor wifi reception on your new iPad. Hope it works for you.

Via OSXDaily.

Saturday, April 7, 2012

Fix Unable To Check For Update An Error Occured While Checking For Software Update

If you are one of the unlucky iOS devices users who are experiencing error message for not being able to update your software wirelessly and receive this following message.

“Unable to check for update. An error occured while checking for a software update”.

Then you can try the troubleshoot suggested in this post, follow one of the steps below, to fix that error message.
  • Why not update your mobile software in iTunes. This one may fix the problem.
  • Go to setting to set your Wi-fi Off and then set it to ON again.
  • Or restart your iPhone, iPad or iPod touch again.
  • You can also use another workaround, like reset network setting, to do so navigate to Settings > General > Reset > Reset Network Settings.
  • How about alter or change DNS settings of yours. Navigate Settings > Wi-Fi, and click on the blue arrow that is appeared beside your current Wi-Fi network. Click the “DNS” field , fill this DNS servers; 8.8.8.8, 8.8.4.4 (Google’s Public DNS) (This one can also be used to speed up Wifi on iPhone and iPad).Once it's done, now you can try the software update.
Hope this post helps and see you in another posts.

How To Use Dictation On New iPad

Have you been able to utilized the new iPad feature which is Dictation, if you have not, then the feature will be futile. Therefore in that case and for some reason you are unable to find the way to use it, this post will help you. Just keep reading.

As the feature's name suggests, you are able to dictate message using your voice instead typing for email or etc. So to use Dictation on new iPad, just follow this simple step.

Tap Settings > General > Keyboard > Dictation, and turn the feature to ON.

Now tap this mic icon each time you want to dictate message.

Dictate New iPad

Hope this post helps you!


Fix No Service On iPhone 4, iPhone 3GS On iOS 5.1

This post is about to fix No Service on iPhone 4, iPhone 3Gs after updated to iOS 5.1. The culprit of the No Service error is due to Ultrasn0w you have installed to unlock your jailbroken iPhone 4 or 3Gs, the error appears because the Ultrasn0w is not compatible with iOS 5.1, at least currently.

The iPhone dev team has not update their unlocking utility to be compatible with iOS 5.1 therefore you get the No Service error. But I believe those nerds in iPhone dev team will be updating their toy. Before the update comes to public release, there is a temporary solution for the problem. In this post will help you fix No Service on your jailbroken iOS device on iOS 5.1.

First thing first, this guide can be used to the following basebands:

iPhone 4
  • 1.59.00

iPhone 3GS
  • 6.15.00
  • 5.13.04
  • 5.12.01
  • 5.11.07
  • 4.26.08

You don't know what your baseband is? Then navigate to Settings > General > About > Modem Firmware.

How to fix No Service Error On iPhone 4, iPhone 3GS on iOS 5.1 with Ultrasn0w Fixer for 5.1


Step 1: Launch Cydia on your iPhone 4 or 3GS, then navigate to this path: Manage > Sources > Edit to Add the url source below: (And click Add Source)
http://repo.iparelhos.com

Step 2: Once it's added, then search and install Ultrasn0w Fixer for 5.1.

Ultrasn0w fixer for 5.1

Step 3: Now restart your device, then insert your sim card. Then boot tethered your jailbroken iPhone 4 or 3Gs again or else you will receive the Apple Logo and stuck with it, as we know the only available method to jailbreak iOS 5.1 is tethered jailbreak.

Congratulation you have get rid of the no service error on your jailbroken iPhone 4, 3Gs running on iOS 5.1!

How To Fix Facetime And iMessage Waiting For Activation Problem On iPhone

If you are here because to find a how to guide to fix Facetime and iMessage problem, because they are stuck on Waiting for Activation. Then you are in the right place. In case you have a jailbroke iPhone (3GS baseband 6.15.00, 4 baseband 4.10.1) running on iOS 5 or 5.0.1 you will likely experience the Facetime and iMessage doesn't activate.

So to fix the said problem, you can follow the guide in this post. Firstly, download the latest iTunes 10.6.1 or newer version, and use Wifi or data as your internet connection.

How to fix Facetime and iMessage doesn't activate (Waiting for Activation) on iPhone.


Step 1. Now turn your off Facetime and iMessage if they are on.

Step 2. Open Cydia and then add the following url repo source. Do so by navigate to Manage >> Sources >>> Edit >> Add.

http://repo.binger.com

Repo Bingnger Cydia

Step 3. After you added the url, now search and then install Cydia for SAM.

Step 4. After SAM is succesffully installed, now open SAMPrefs on your iPhone's Homescreen and then head to Utilities.

Step 5. Click on the Revert Lockdown to stock. You will get a message saying it's successful. And then click on De-Activate iPhone (clear push). You will get a success message appears for second times. Simply click on OK then to close it.

Step 6. Plug your iPhone to computer, and then launch iTunes. Don't worry if the error message appears, it means everything is fine. And then sync your device, do so by right-click on your device on the left window pane and then choose Sync.

Step 7. After the sync process completed, launch SAMPrefs on your iPhone and then click on More Information. If you get WildcardActivated, means you are on the right road, and you can continue to the next steps.

Step 8. Back to SAMprefs and go to Utilities. Click on Backup Activation on Restore Activation option. Then you'll find your iPhone respiring afterward.

Step 9. Reboot the device of yours, and then sync it with iTunes again. Once the sync completed. Open the Appstore and then search for iPusher and install it.

Step 10. After iPushes is installed successfully. Again, reboot your device. For the last time, sync your device to iTunes again. Afterward open iPusher. Then click on Test Push Notifications field, and after sometime, you will be notified with this message: Yay, push notifications work fine!

Step 11. Done. Now turn your FaceTime and iMessage ON. Do so by navigate to Settings > iMessage or Facetime to ON. Now they are fully activated. If otherwise, I mean you fail to activate them, then reboot your device once again and then try to turn them ON once more. This will work.

Congratulation now you have fixed FaceTime and iMessage Waiting for Activation problem on iPhone 3G or iPhone 4.

Transfer Or Import iPhone Apps to Computer Without iTunes

Transfer or import iPhone apps to Computer. This post is explaining the steps you can follow to transfer or export the Apps from iPhone, iPod touch or iPad to computer (Windows or Mac) without iTunes intervention. Yes you can transfer your desired apps to both PC or Mac without the help of iTunes.

There is an app that you can use for that purpose and the app is free to download. The app name is iFunbox which you can use to browse within iOS device's stomach to find or search the apps inside it to be transferred or imported to computer.

iFunBox

Once you have download iFunBox for Mac or Windows, you can browse to the User Applications to shows all the installed applications listed in your device. Then select the apps you wish to transfer, after the apps are selected then right-click your mouse to choose Backup to .ipa package.

Backup To iPad Package iPhone

And you will be asked to choose place to save the ipa file, then choose the place you think is proper. Once you have placed the iPa app files then you can continue to transfer or install iPa files to iPhone, iPad, iPod touch without iTunes.

Oke that's how to transfer or import applications iPhone, iPod touch iPad to computer (Windows or Mac).

Friday, April 6, 2012

Fix End Call, Can Not Call On iPhone 4s, iPhone 4

Fix End Call on iPhone. If your iPhone 4 or iPhone 4s is experiencing the can not call or can not hang up, and your iPhone screen displays End Call. Then don't worry many experience this condition too and there is a fix for that problem.

This End Call caused by unable to call or unable to hang up is a general situation to the iPhone 4 or 4s who just being jailbroken running on iOS 5.0.1

Once you make a call, the one you call can receive your call, however if he/she answers, then both of you are unable to hear each other voices.

And then End the call, your screen will display End Call click the Home button but the situation is the unchanged, so you are forced to quit by double-clicking the home button. If you think rebooting your iPhone will resolve the problem, then you are wrong, it still exist.

Fix End Call

So this is what you need to do to fix End Call, can not call or can not hang up:

Navigate to Settings >>> General >>> Restore >>> Restore all the settings.

And see you again in another posts.

How To Install Cracked iPA Apps Without iTunes Using iFunBox

In case you don't want to install IPA applications (app) using iTunes for your iPhone or iPod touch, then there is a workaround for you. There is a free app called iFunBox that can be used for that purpose.

You don't need iTunes if you don't want too once you have iFunbox installed on your existing OS, or simply using it as an option if there is a problem on your iTunes. So you have a second option which is iFunBox to download and install application for your iOS based devices.

And no need to jailbreak your device to use iFunbox to further install the apps you have purchased. And you don't need to install installous to install unsigned or unofficial .ipa based on AppSync. And you can easily install apps in batch easily using iFunBox app that is available for Windows and Mac.

How to install Cracked iPA Apps Without iTunes Using iFunBox

1. Once you've download iFunbox, open it and then connect your device to your computer using USB. You will see your device content in the left pane of the window.

iFunBox


2. And then click on User Applications from your device, and then all your installed apps will appear. Now right-click anywhere on the application area and then choose Install App [AppFastIn].

3. Then a new popup window will be asking you to choose iPA package. so go to .ipa app you wish to install and then hit open.

4. iFunbox will begin the installation, once it finishes, iFunbox will notify you.

5. Done.

How To Check Flashback Trojan Infected Mac Or Not

Probably this is your first time hearing Mac OS X infected by malicious software, like Trojan. As we know that the Apple computer operating system is widely known for its strong defense against malware. But not this time, there is a flashback trojan has been attacking Mac OS X and according report I red the trojan has managed to infiltrate to over 600,000 Mac users and probably more now.

Things get worse because the flashback trojan was written in an unknown language, and it does not need to know your password to access you MAC OS system . But don't worry too much, you can check whether your Mac is infected, if so than you can remove it.

Mac Flashback Trojan

How to check whether your Mac is infected by FlashBack Trojan.


1. From Utilities folder, then open Terminal.

2. Then, once you're in, follow these easy steps to detection:

3. Within it, then type the command below in Terminal

defaults read /Applications/Safari.app/Contents/Info LSEnvironment

4. Make a note of the value, DYLD_INSERT_LIBRARIES

5. Continue to the step 6 if you receive this error message:

The domain/default pair of (/Applications/Safari.app/Contents/Info, LSEnvironment) does not exist

6. Type this command in Terminal:

defaults read ~/.MacOSX/environment DYLD_INSERT_LIBRARIES

7. Take note of the result. Your system is already clean of this variant if you got an error message similar to the following:

"The domain/default pair of (/Users/joe/.MacOSX/environment, DYLD_INSERT_LIBRARIES) does not exist"

If you get variant "does not exist" after running the commands from the above steps, means your MAC is clean or not infected. If the command gives you result other than that, you can head to F-secure to deal with it.

Via Gizmodo.

Want to easier method? You can download FlashbackChecker app to check Trojan Downloader Flashback on Mac.

Thursday, April 5, 2012

How To Enable NFC On AT&T Samsung Galaxy Note

As one of the AT&T Samsung Galaxy Note, have you known that your NFC (Neaf Field Communication) chip is unable yet. It would be unfortunate having this chip within your Note, yet let in disabled. So in this post I would like to share the instructions to enable the NFC chip on your Samsung Galaxy Note, thanks to XDA forum members named Fox 689 for releasing this flash and install instructions.

And before enabling the NFC Chip to your Note, you need to firstly backup your device because you will flash this mod via recovery.

NFC

How to enable NFC on AT&T Samsung Galaxy Note.
  • Download this.
  • Reboot your Galaxy Note into Recovery mode if ClockworkMod Recovery is already installed on your device. Don't know whether your have it installed on your device? Visit this link to install it.
  • Backup your device now, well because we are going to flash the mod.
  • Then select "install zip from sdcard"
  • Select "choose zip from sdcard" or "choose zip from internal sdcard" depending on where did you save it.
  • Find the file of yours to be installed.
  • Restart your device. Once it's on you will see the NFC options that you can turn on in Wireless Settings, also able to install NFC apps in the Play Market.
Related news about Galaxy Note:

Download And Install Leaked Android 4.0.3 ICS ROM For AT&T Samsung Galaxy Note

As the title of this post says that you are goind to download and install the leaked Android 4.0.3 (ICS) ROM for your AT&T based Samsung Galaxy Note. Thanks to RootzWiki to make this leaked Android ICS available to download, however things not always serve everyone because currently this build only supports Windows operating system only.

RootZWiki had put a serious tests before finally sure this leaked is worthy of sharing, so all of us will end up feeling satisfied not just come out saying yes I have ICS installed but then uninstalled it. Anyway here is a list of features that work:
  • Face Unlock is fully functional
  • LTE connections are solid and up to speed
  • Phone calls work great both ways
  • Audio quality is up to par
  • Stereo Bluetooth is fully functional
  • MMS is fully functional
  • GPS is fully functional
  • Google Talk and Video Chat work
  • Google Voice is fully functional
  • Task Manager is smooth and transitions are quick
  • Downloaded Flash video and in-browser video works flawlessly
  • Chrome autosync is fully functional
  • AT&T Hotspot functionality works, external devices connect fine
And one more thing your external SDCard will not be wiped out, but your internal SDCard will be formatted during the installation process.


Are you interested to install this build to your Samsung Galaxy Note? Then follow the following steps.

But before proceed, read this disclaimer: that no one will be responsible for any damage might cause to your device after following the steps, do this at your own risk. Beside no body is forcing you to do so, right? So let's do it.

Download and Install Leaked Android 4.0.3 ICS ROM For AT&T Samsung Galaxy Note.


Step 1: As always download Odin, click this link.

Step 2: Reboot your device in download mode. Do so by holding Power, Volume Down and then Volume Up.

Step 3: Use USB cable to connect your Samsung Galaxy Note to your PC.

Step 4: Run the Odin One-Click file in order to get your device updating. It should detect your device as com3 (in yellow).

Step 5: Now click on PDA button, then choose ICS Rom (<-Download Link). And click start.

Congratulation now your Samsung Galaxy Note device is running on the Android 4.0.3!

Via RootzWiki.

Recommended reading about Galaxy Note:

How To Manually Uninstall Unstable Cydia Tweak App Without Opening Cydia

If your iPhone is experiencing a constantly crashing Springboard and Cydia can't be opened, well the situation is likely to happen frequently when you installed a Cydia app or tweak that is not compatible with your device model or an iOS firmware your device is running on. And you need to uninstall the app that creates the mess.

But unfortunately you are unable to launch Cydia to uninstall the unstable and unsupported app or tweak, but don't worry there is a workaround for that problem. You can manually uninstall the incompatible tweak package in safe mode. Below is the steps to do so.

Cydia


Manually uninstall Unstable Cydia Tweak or App without opening Cydia.

Go to SBSettings, then click on power on the bottom-right, you are opened up to
reboot
power off
"safe mode"
and lock.
And the SBSettings can be opened on the lockscreen too, therefore you don't have to unlock the iPhone or iPod anyway.

Hope this post helps and see you again in another posts.

Wednesday, April 4, 2012

How to install Spite on iPhone 4 iOS 5.1, 5.0.1, 5.0

Updating to the latest iOS firmware are a general mistake if the firmware is a newly released because your unlock and jailbreak utility will no longer work. And your baseband is changed too, to which makes your iPhone locked to the one GSM carrier, for example you are stuck in Baseband 2.0.10, luckily you can unlock it.

In case you have mistakenly updated your iOS to iOS 5.1, Spire will stop to work as this Siri port is not updated by its developer, chpwn, to keep up with iOS 5.1. But fortunately there is a solution for the said problem. You can grab Spite, the Spire's alternative that can be used by iPhone running on iOS 5.1 firmware.

Spite is a Cydia tweak created and developed by TechNetec and it's still in beta stage, therefore don't expect too much. And to install it, a tethered jailbreak is required. Currently Spite is in version 2.2. The updated version of the software allows for an uninstall without restoring in iTunes.

Siri Spite Cydia

How to install Spite on iPhone 4 iOS 5.1 / 5.0.1 / 5.0 (or on iPhone 3GS, iPod Touch 4G, iPad).

Step 1: Tethered jailbreak your iPhone, iPod, iPad first using Redsn0w, to verify the version of iOS your iPhone is running.


Step 2: Now add the Technetec's url repo --- Manage > Sources > Edit > Add:

http://repo.technetec.com/beta/

Step 3: Afterward, now search the Spite 2.2 and then install the app. The total size of the Spite is 150Mb.

Step 4: Reboot your device.

Step 5: To make Spite works, you still need a Siri proxy, therefore find one on the internet or borrow from your friend that owns iPhone 4s.

Hope this post helps and see you again!

Via TechNetec.

Thursday, March 29, 2012

Guide To Save SHSH Blobs For iOS 5.1 Using iSHSHit 1.0.14

This is a how to guide to save iOS 5.1 SHSH Blobs using iSHSHit 1.0.14. If you never heard about iSHSHit before here is a short explanation, this is a Cydia app developed by iOS developer Aaron Lindsay that is to save the iOS 5.1 SHSH Blobs directly from your iOS device for further downgrading.

It has similar offer like TinyUmbrella and iFaith, one thing that separates iSHSHit from the both is the ability to save the SHSH Blobs from iOS device and available in Cydia.

iSHSHit

Now let's save iOS 5.1 SHSH Blobs with iSHSHit.

1. Jailbreak your iOS 5.1 device first if you haven't. (Follow this tutorial)

2. Search iSHSHit 1.0.14 in Cydia under BigBoss repository, once you found it then install it.

3. Your device will begin the installation, once it finishes, restart your device and you will then see iSHSHit icon on your Springboard, then open the app.

4. You will see your unique chip ID, and options like to change your model, select the SHSH blob you wish to save. Click Manage SHSH, you will be presented with a list containing all the SHSH Blobs you previously saved.

5. Select the option you wish in the settings pane, click the save button to start downloading and saving SHSH blobs to your iPhone.

6. After iSHSHit is done saving the iOS 5.1 SHSH blob, then click OK on the push notification message.

7.Finish.

Hope this post helps and see you in another posts.

Monday, March 26, 2012

Enable Automatic Downloads For iTunes Store On iPhone, iPad, iPod Touches

In the previous I posted about how to enable iTunes automatic download on computer, and now I want to continue the post with enable automatic download on iPhone, iPad and iPod touch. Once you finished applying this tips you are able to download automatically purchases you bought from iBookstore, iTunes and App store instantly to your iOS devices.

Instructions.

  • Now press Settings > Store from your devic.
  • Now press Sign In -- skip this if you are already signed in to the iTunes Store.
  • Now enter your App Username, Apple ID and password.
  • Press On/Off switch to enable Automatic Download for items of your choice, like Music, iBooks or Apps.

Automatic Download iPhone

Note.

  • If you don't find iBooks as option in Automatic Downloads area, then you need to download iBooks and install it from the App Store.
  • You can also enable / disable Automatic Downloads on cellular network like Wi-Fi, 3G. Simply tap On / Off next to Cellular in Settings > Store. Cellular downloads are limited to a file size of 20 MB or smaller.

Hope this post helps you and see you again in another posts.

Thursday, March 22, 2012

How to enable iTunes Store Automatic Downloads On Computer Windows And Mac

Now I would like to share tips to enable automatic download item or applications you purchased from iTunes store, App store or iBookstore instantly to your PC or Mac computer. And this tips supports iTunes 10.3 3 and iOS 4.3.3 and higher (iOS 5.X) on iPhone 4 in CDMA Model. Once, you applied this tips you can automatically download applications to your computer.

Firstly we need to enable automatic download on the computer of yours for iTunes store, iBookstore, or App Store. Follow these steps:

1. Launch iTunes, and authorize your PC using your Apple ID, by going to Store > Authorize This Computer. (Skip this if your PC is already authorized).

2. And now it's time to set enable automatic download.

On Mac computers: Select iTunes > Preferences then press the Store tab.
On Windows computers: Select Edit > Preferences then press the Store tab.

3. Now, select or check which items you like to set for Automatic Downloads, whether its Music, Apps, or Books under "Automatic Downloads." Or check all of them!

Automatic Download iTunes For PC Computer

Remember this tips applies only for new purchases made after the automatic download enable.

Wednesday, March 21, 2012

How To Speed Up iPhone, iPad Wifi Connection With DNS Servers

Speed up Wifi Connection for iPhone, iPad, iPod touch with custom DNS. Having slow internet speed is something that I and you too avoid most, as we want to get where we wish as fastest as possible without delay or slow loading pages.

This situation is our most wanted, whether we are using PC or browsing with our mobile devices, iPhone, iPad or iPod touch. And whether we are using Wi-fi or non-wifi network connections. We want fastness, no fussiness.

Therefore, in this post I would like to share a tips to speed up your slow Wi-Fi connection on iPhone, iPad or iPod touch.

The general culprit which causing this issue is related to wireless network changing. And to get out from this inconvenient slow Wifi connection to use custom DNS servers which are near to your domicile.

But you can also use the -- I think -- universal DNS serves that are proven reliable and Wifi connection boosters -- Google DNS Servers and OPen DNS Servers -- these are two DNS servers offered by me as solution and by many people.

You can try all of them to see which one that gives you speed most for iPhone and iPad Wifi connection. And this works for device older than A5, but it also said can work too for A5 devices. So have a try.

Here are the DNS servers.
  • Google DNS servers: 8.8.8.8 and 8.8.4.4
  • OpenDNS servers: 208.67.222.222 and 208.67.220.220
Here is how to add the DNS servers.
  • Go to Settings and then tap on WiFi.
  • Choose the network you like to place the custom DNS servers.
  • Click on the Numbers in DNS and type the custom DNS server.