Showing posts with label Mac OS. Show all posts
Tuesday, June 5, 2012

How to Jailbreak iOS 5.1.1 iPhone 4S Untethered With RedSn0w 0.9.12b1 For Mac

If you are looking the how to jailbreak iPhone 4s on iOS 5.1.1 untethered with RedSn0w 0.9.12b1 for Mac, then you are on the right page. Because today we will elaborate the steps to untethered jailbreak iOS 5.1.1 on iPhone 4s with RedSn0w 0.9.12b1 for Mac.

But before going into the steps, you should now that updating your iOS to iOS 5.1.1 will also update your existing baseband therefore will close the chance to unlock your device. Therefore, it's recommended when you are on iOS 5.1.1, then save your iOS 5.1.1 SHSH blobs.

How to Jailbreak iOS 5.1.1 iPhone 4S Untethered With RedSn0w 

Step 1: make a folder from your desktop and name it Pwnage.

Step 2: Now download the latest Redsn0w's version for Mac here, then put the Redsn0w within the Pwnage folder you created on step 1. And you can also download iOS 5.1.1 firmware here, however if you already downloaded the firmware or already on iOS 5.1.1,you can skip this phase.

Step 3: Now double-click on Redsn0w zip file to unzip it.


Step 4: (Skip this phase if your iOS is already on iOS 5.1.1) Connect your device to computer and then launch iTunes. Now choose your device's model appears on the device's list on the left side. And then hold down Option to click the Restore button. Restore is preferred as it won't create any wasted space on your iPhone.

Step 5: Now open Pwnage folder (from step 1) and then choose the iOS 5.1.1 firmware ipsw. Then hit Choose button in order to continue the step.


You should see now that your device is updated to the new firmware by iTunes.

Step 6: Now execute or launch Redsn0w from the redsn0w folder you unzipped previously on step 3.

Step 7: Now click Jailbreak button, once Redsn0w is launched.


Step 8: Well you will see the magic, the Rocky Racoon jailbreak will take three steps consecutively which are preparing, processing and then finishing up. Just wait until all the steps are entirely finished.

Step 9: When Redsn0w is complete with the three steps above. You will see your iPhone 4s takes reboot, when it finishes rebooting, you should see a new and fresh Cydia icon appears on your homescreen.


For Windows users: Untethered jailbreak iOS 5.1.1 iPhone 4s using Redsn0w 0.9.12b1 for Windows.

Thursday, May 31, 2012

Untethered Jailbreak iOS 5.1.1 With Absinthe 2.0 For Mac

Here is untethered jailbreak iOS 5.1.1 with Absinthe 2.0 for Mac, to continue the previous post that elaborating the steps to jailbreak iOs 5.1.1 untethered using Absinthe 2.0 for Windows.

Therefore for Windows users who own iPhone 4s, 4, 3gs, iPad an also iPod touch and want to jailbreak your device untethered you are pleased to follow the following steps.

Step 1: Download Absinthe 2.0.2.

Step 2: Double click it to mount the downloaded dmg and drag the Absinthe application to your desktop.

Step 3: Now launch Absinthe by double-click on it on desktop.


Step 4: When prompted, plug your device to your PC using USB. Be sure all passcodes or VPN settings are removed first.


Step 5: Now click on the Jailbreak button to begin the jailbreak. 


Step 6: Absinthe will begin jailbreaking by going through several steps like beginning jailbreak, sending initial jailbreak data, waiting for reboot and then completing process. Just wait. Till you find this message.


Step 7: Now you should see a Cydia icon appears on your iPhone's homescreen. Which means your iOS 5.1.1 is jailbroken now!


That's how to untethered jailbreak iOS 5.1.1 on iPhone, iPad, iPod touch for Mac using Absinthe 2.0.

How To Run Absinthe 2.0 On OS X Mountain Lion

Since the release of Absinthe, load of goodies come afterward, aside this tool can jailbreak iOS 5.1.1 unthetered for iOS devices it can also be used on OS X Mountain Lion too. Therefore in this post we are going to elaborate the steps how to run Absinthe 2.0 on OS X Mountain Lion to those who are interested.

Instructions:

Step 1: Download Absinthe 2.0.2 the latest one, from this link (According your OS).

Step 2: Double click to mount the downloaded dmg, and then drag the Absinthe to your desktop.


Step 3: Now right-click on Absinthe you dragged previously on your desktop, now choose Show Package Contents on the contextual menu.


Step 4: Now double-click to the folder named: Contents.


Step 5: Now double-click the folder named Mac0S.


Step 6: Now open a new Terminal window.

Step 7:  Now drag Absinthe-10.6 executable into the Terminal window you opened in step 6.


Now click Return in order to launch the application.


Via: iClarified.

Wednesday, May 23, 2012

How To Format External Hard Drive And USB Drive In Mac OS X

This is for MAC OS X users who wish to format External Hard Drive or Flash Key to be compatible with Mac OS X, as we all know that Mac OS X is able to read various filesystem formats including those from Windows, Windows MSDOS, NTFS and more.

However to get a cleaner road for your filesystem it is recommended to make it compatible with Mac OS by formatting the file. And the following are the steps you can follow.
  • Plug your USB or Hard drive to your Mac computer.
  • Navigate to Applications > Utilities, and then run Disk Utility.
  • Locate the drive name from the left hand side of Disk Utility and click on it
  • Hit on this tab: Erase on top.
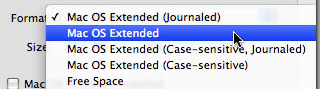
  • On the Format: click the contextual menu and you need to choose: Mac OS Extended (Journaled).
    Format Hard Drive In MAC OS X
  • Name your drive, any name you like and it can be changed latter.
  • Hit the Erase button and then reconfirm on the appearing popup window.
That's how you format external hard drive or flash key to match with Mac OS.

Monday, May 21, 2012

Enable Trim Support For Third Party SSD In Mac OS X Lion

If you are one of the Mac OS X Lion users who wants to add TRIM support for your third party SSD In Mac OS X Lion. You can see a free and handy utility, named TRIM Enabler to add support for TRIM for your third party SSD in Mac OS X Lion.

As you have known that the OX X Lion does not include TRIM support for all non Apple SSD. So this TRIM Enabler is your rescuer on this concern.

Trim Enabler

Once the application is downloaded and enabled, then Trim Enable will patch your OS X Lion systems to increase SSD performance.

You can download the TRIMEnabler from this link or visit the developer site here. It is in version 2.0b4 currently. Simply run the app to switch to ON mode to enable it and then fill your admin's password in order for SSD driver patching to get TRIM support for your third party SDD in Mac OS X Lion.

TrimEnabler can also be used to monitor your SSD drive condition, if there is something bad happens you will find solution for it and if you want to disable the app simply switch to OFF mode in its setting area.

Saturday, April 21, 2012

Create Bootable USB Flash Drive Of Mac OS X Lion 10.7

Albeit Apple has released an official bootable USB for Mac OS X Lion 10.7, but it's not free and cheap either. It takes your a $69 to get this bootable USB. Therefore in this post we will learn how to create or make bootable USB drive for Mac OS X Lion 10.7.

In this installation of Mac OS X Lion 10.7 via Flash Drive or DVD guide, we will be utilizing Disk Utility and App Store installer. And save you bucks!

Mac OS X Lion

Create Or Make Mac OS X Lion 10.7 Bootable USB Flash Drive


Place the Lion InstallESD.DMG File

Step 1.Go to this folder: Application once the download of Lion is complete, within the folder search and find the Install Mac OS X Lion.pp file. Now right-clicking on the file to choose Show Package Contents.

Step 2. Navigate to this path: Contents > SharedSupport directory. Copy and paste this file: InstallESD.dmg to your desktop.

Now format your USB.

Step 3. Make a backup to your data, before formatting your system.

Step 4. Now connect your USB flash drive to your Mac.

Step 5. Via Applications launch Disk Utility.

Step 6. On the Disk Utility's left pane, choose the connected USB and click on Partition tab.

Step 7. Via the Volume Scheme dropdown menu, choose 1 Partition.

Step 8. Enter a name for the USB and then you must Choose Mac OS Extended (Journaled).

Step 9. At the bottom window, click on Option button. Choose GUID Partition Tab and then hit OK. Now implement on Apply at the buttom right of the start formatting.

MAKE MAC OS X LION BOOTABLE USB

Step 10. Double-click on InstallESD.dmg (that you copied onto your Mac desktop) to mount the Lion disk image (mounted InstallESD.dmg should appear on Disk Utility application and desktop);

Step 11. On the desktop, double click on InstallESD.dmg in order to mount the disk image of Lion.

Step 12. Choose the plugged USB On the Disk Utility's left pane and place it into the Restore tab.

Step 13. Click to drag the IMac OS X Install ESD via left pane and place it into the Source field.

Step 14. Drag the USB drive via left pane, to drop it into the Destination field.

Step 15. Be sure the USB drive is right, don't choose the wrong one. Click on Restore button.

Step 16. The Lion 10.7 image will be restored to the USB Flash drive. Therefore wait til restoration complete.

BOOT MAC OS X LION FROM USB

Step 17. While your USB drive is plugged into Mac, then reboot the Mac.

Step 18. When the OS X start-up sound is heard then hold down the alt/option key.

Step 19. Now you can select the USB Flash Drive to be rebooted.

Step 20. You will now see the on-screen instructions to install OS X Lion, then follow them.

Tuesday, April 10, 2012

Check And Remove FlashBack Trojan On Mac With Kaspersky Removal Software For Free

This is another Flashback trojan checker post, but this one adds more wanted ability which is to remove the malwarre as well. You might be asking yourself, who offers this wonderful? It's Kaspersky malware removal.

Since the invasion of Flashback trojan is so widely and has been managed to infect to hundred of thousands Mac users have made Kaspersky decided to take part of this battle. It's worth saying that currently there are 600,000 infections reported and the number is allegedly will be growing.

Kaspersky

Therefore if you are wonder whether your Mac is infected or not, you can go to FlashBackCheck to find out. It will then check the Mac’s UUID of yours to be examined with a list of infected machines. And don't worry of showing your UDID, because it's completely safe, at least in this case. If your systems is infected with Flashback Trojan, then you will be offered a free trial version of Kaspersky removal tool.

FlashbackChecker To Check Trojan-Downloader FlashBack Trojan In Mac OS

Previously I posted a step by step guide to check whether your Mac OS infected by Flashback Trojan, the guide is a valid method to find out has the trojan infiltrated your system or not, like any other 600,000 Mac users -- the unlucky ones.

But there is easier way to find out the Trojan, instead of digging your Mac Terminal area, you can utilize a free app, namely FlashbackChecker, currently available for free in GitHub. As the name suggests, it's only check the existence of Flashback Trojan within your system, NOT remove it.

You will receive a report, once you have it installed to your system and then hit a provided big button to prompt user to check the infection. Just like in the following picture.


In case FlashbackChecker back with a report that your system is infected by FlashBack Trojan, then you can continue to F-Secure instructions to remove the Flashback's infection on your Mac OS system.

Download FlashbackChecker 1.0 app (Github site's link).

Support: Mac OS X 10.5 and higher.

So I hope this post helps you and see you again in another Technology posts.

Friday, April 6, 2012

How To Check Flashback Trojan Infected Mac Or Not

Probably this is your first time hearing Mac OS X infected by malicious software, like Trojan. As we know that the Apple computer operating system is widely known for its strong defense against malware. But not this time, there is a flashback trojan has been attacking Mac OS X and according report I red the trojan has managed to infiltrate to over 600,000 Mac users and probably more now.

Things get worse because the flashback trojan was written in an unknown language, and it does not need to know your password to access you MAC OS system . But don't worry too much, you can check whether your Mac is infected, if so than you can remove it.

Mac Flashback Trojan

How to check whether your Mac is infected by FlashBack Trojan.


1. From Utilities folder, then open Terminal.

2. Then, once you're in, follow these easy steps to detection:

3. Within it, then type the command below in Terminal

defaults read /Applications/Safari.app/Contents/Info LSEnvironment

4. Make a note of the value, DYLD_INSERT_LIBRARIES

5. Continue to the step 6 if you receive this error message:

The domain/default pair of (/Applications/Safari.app/Contents/Info, LSEnvironment) does not exist

6. Type this command in Terminal:

defaults read ~/.MacOSX/environment DYLD_INSERT_LIBRARIES

7. Take note of the result. Your system is already clean of this variant if you got an error message similar to the following:

"The domain/default pair of (/Users/joe/.MacOSX/environment, DYLD_INSERT_LIBRARIES) does not exist"

If you get variant "does not exist" after running the commands from the above steps, means your MAC is clean or not infected. If the command gives you result other than that, you can head to F-secure to deal with it.

Via Gizmodo.

Want to easier method? You can download FlashbackChecker app to check Trojan Downloader Flashback on Mac.